Showing posts with label decoction mash. Show all posts

Tuesday, October 18, 2016

The Clone Wars; Designing Home Brew Recipes

Hello all.  John here.  Today, I am going to tell you all about my approach to cloning beers.  I am not afraid to admit it.  When I began my home brewing saga, my buddy and I had no idea what  we were doing.  We knew we liked super hoppy IPAs but also wanted to make beer that would appeal the general public.  Our first attempt was an Irish Red, which we had really high hopes to become the "next big thing" in the home brewing community.  I am not sure what we were thinking...we knew next to nothing about brewing beer.  The end result of our effort was a terrible overly sweet batch of first time home brew.  Fast forward 18 months, we have advanced quite a bit, by using one method to help us connect to our beer on a higher level.  We design all of our recipes from top to bottom, start to finish.  We plan the malt, the yeast, the hops, and the water every single time.

Now I am certainly not the first person to post about designing a home brew recipe, but maybe I can shed some light on my process to make it less intimidating for those looking to "up their game".  The easiest way I can explain it is, I work backwards.  I start thinking about what I want the finished product to be like.  It is not too different from that coach you had in middle school that told you envision that buzzer-beating shot going in, or your boss telling you to dream about  your next sale.  If you know where you want to get to, it is pretty easy to complete the process to get to the promise land.

Plan your beer, take comprehensive records.
First thing first, write down what you want your beer to taste, smell, and look like.  Once we have accomplished this, we turn to several trusty internet tools to help us put the structure together.  Our group uses brewtoad.com or brewersfriend.com for recipe construction and we begin to pull in the ingredients desired to meet the agreed upon results.  Brewtoad is easier to use.  Brewersfriend is more comprehensive.  Our brew sensei often uses Beersmith, it is the penultimate brewing program.  This includes our malt bill (all-grain brewers here), hop additions, yeast selection, and any other additives or adjuncts we would like to add to the batch.  After pulling in the ingredients, the recipe tool you choose should begin auto-populating the parameters of the beer; including Original Gravity, Final Gravity, SRM (Color), and ABV%.


I would say that this guys clone looks pretty dang close!
Todays Recipe:  Pilsner Urquell - Now if you are not familiar with Pilsner Urquell, it is the world's first, and arguably best light colored lager.  Pilsner Urquell was developed in Plzen Czechloslovakia, in the state of Bohemia.  That is where the term Pilsner, and the term Bohemian Lager originate from.  It is perhaps the most influential beer in history, and is the inspiration for 2/3rds of the beer produced in the world today.  It literally changed everything about how beer is brewed.   Before Pilsner Urquell there were no light colored lagers.  Now historians argue as to whether or not there were even lagers before Pilsner Urquell, but there we definitely no golden pilsners.   Apparently prior to 1840 the beer in Plzen was so bad that in 1840 the city burghers ordered 36 casks of the beer to be poured out, and a new brewery to be built.  The people of the town invested in the new brewery, and helped build it.  They then hired Joseph Groll (a Bavarian) to come to Plzen and develop a new beer for their new brewery.  On November 11th 1842, Pilsner Urquell was first served at the feast of St. Martin.   And very little has changed about it over the years.   It is still fermented in open oak casks.  It is lagered in underground tunnels carved from the earth for the purpose of lagering.  The lagering tanks are oak, and are coated with pine tar pitch.  The boilers and mash tuns are coal fired, and are made of copper.   When you drink this beer you are drinking history.

We are fortunate to live in a large metropolitan area with some great beer bars.  One of the best is called Bier Station.   And on Friday the 14th of October, Bier Station hosted a great event.  Pilsner Urquell, unfiltered and un-pasteurized.  Wow!  This beer is good the way we get it here in the states. But holy cow was it good unfiltered and unpasteurized, fresh and balanced, malty and hoppy. The good news... We can make this beer when ever we want we just need to find and perfect a reliable recipe.
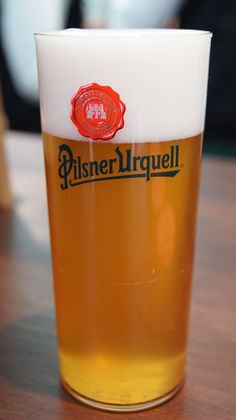
Pils Urquell unfiltered
and un pasturized was
an amazing experience.
So, where to find a reliable clone recipe? Well, here are some good sources for clone recipes. - Brew Your Own Magazine.  The American Homebrewer's Association (AHA) , major bloggers (like this one, Brulosophy, The madfermentationist, Bear Flavored, and Scott Janish.)  On these blogs you will find a whole treasure trove of carefully vetted and award winning brewers and brewing recipes.  You will also find helpful articles and tips.  The recipe we chose to start with was Michael Tonsmiere's Pils Urquel clone.  Well known blog (themadfermentationist).  Michael Tonsmiere is a great authority on sour beers.  His book is a valuable resource for those of you who want to dabble in sour beer making.  So it may surprise you that we chose a lager recipe from him.  But we know the caliber of brewer that he is, and we knew that we could use this recipe as a starting point for developing our own version.

Now a lot of you begin your cloning career by just choosing a recipe and brewing it, with no modifications.   Here is the problem with that,  you need to be modifying that clone to fit your brewing style and your brewing system.  We get 73.24% from no sparge, we get 77.8% from a decoction no sparge. We lose 1 gallon of trub in a 10 gallon batch.  We boil off 1 gallon per hour, so 1.5 in a 90 minute boil.  If we want 11 gallons into the fermenters we have to boil 13.5 gallons. Michael gets about the same efficiency as we do, but not exactly the same efficiency.  So we will have to adjust the grain bill for our slightly higher efficiency.

Now pilsner Urquell is entirely Saaz Hops. So no problem there, easy to source.  But we need to modify the hop bill as well.  This is the biggest mistake that brewers make when trying to clone a beer.   The don't modify for the current alpha acids of this years crop of hops. And if you don't modify for current acids, your beer can be way off.   Here is an example. The alpha acid units are calculated by taking the ounces x the alpha acid percentage.  So 1 ounce of a 10% alpha acid hop is 10 AAUs.  2 ounces would be 20 units.  But alpha acids change from year to year.  And sometimes radically.   Saaz was 9.9% in 2015, it is usually about 3.75% obviously in 2015 we needed less hops. So here is how you calculate for correct replacement.   1 ounce of 3.75 AA% hops = 3.75 AAUs.   So to get 3.75 AAUs of 9.9% Alpha Acid Saaz you only need.  .378 ounces.   .378 ounces x 9.9 = 3.75 AAUs (alpha acid units).   Always calculate your alpha acid units.

Modifying the recipe for special ingredients, or special characteristics of the brewery.  In the case of Pilsner Urquell,  they ferment open in oak barrels, and then they lager in pine tar pitch lined barrels.   This lends the beer a unique character.  Well obviously we are not going to do that.  But we may to a semi open fermentation. just covering the fermenter loosely with a towel affixed with a bungee cord.  We may also sanitize some oak chips and put them in during fermentation.  That should create similar fermentation and similar atmospheres of pressure, and still keep the nasties out.  But some of the traditions of the brewery can only be replicated with common sense on a home brew level. Obviously we are not going to line our fermenters with pine tar pitch.  So how do we replicate that on the home brew level?   A touch of smoked malt, should do the trick in this recipe for duplicating the pine tar character..  How much... well that is the fun of the cloning process.   We wont know until we try it.  We do know that you do not taste smoke when you drink a pilsner urquel, but there is a unique character.  So we will only add a tiny amount, an ounce or two.  We have loads of saaz hops, so in all likelihood we will make 10 gallons and ferment 5 gallons with our traditional method, and 5 gallons with our changes (intended to replicate the brewery).  Is it necessary to replicate the brewery?  No, but it is fun.


Choosing the right yeast.   Does it really matter? Yes, and no.  In some beers is is critical.  In some beers the yeast is a big part of the character of the beer.  In most lagers, the yeast is not a predominant feature of the beer.  So Yes, a lager strain is needed.  And No, the strain you use is not really that critical.   We prefer Fermentis 34/70 for almost all of our lagers.  And 34/70 is a dependable reliable yeast.  This amazing lager strain can make authentic lagers (not hybrid or mock lagers, actual lagers) at 60 F.   This has been displayed by many blogs, including this one.  Now, you need to know that Pilsner Urquell has a malty sweet finish, and a touch of sulphur.  So with a Pilsner Urquell you need to consider stopping the fermentation a couple of gravity points higher than the terminal gravity, and if we don't get the yeast character we want, we will use Saflager S189 next time (it has a touch of sulphur).   You can halt fermentation easily with a good cold crash.  But in our case, we will be bottling these beers so we will just let it finish out and then we will count on a certain amount of sweetness from the bottle conditioning.  Remember we are trying to make this as similar to the golden unfiltered, unpasturized lager we got to try at Bier Station.

The recipe.  Our inspiration can be found here.  And here is our final recipe modified for this years hops, and for our efficiency.   Is this the ultimate final version of our recipe?  No, of course not.  But it will be fantastic beer that we will enjoy.  We will also take notes and talk about how to change it to be exactly what we want it to be.  We often start out trying to clone a recipe and then end up deciding not to continue the cloning process. Electing instead to focus on another aspect of the beer, and focus on making the beer exactly what we want it to be, rather than copying the original beer.  As you review this recipe you can see that we made subtle changes to Mike's original recipe.


Dave jumping in here.   Now you may notice that this is a triple decoction recipe.  If you are not familiar with decoction, I really encourage you to go back and read this blog.  And read this blog.  Oh, and watch this video.  Decoction is not hard, once you learn what you are doing.   Basically you are going to do a multi step mash, and to raise the temperature of each step, you are going to remove 2/3rds of the grain in the mash tun and decoct it.  That means you are going to bring it to 150 -155 F for 10 minutes, and then to a boil for 15 - 20 minutes.  You will need to stir constantly.  If you are a new brewer, this might not be the recipe to try to learn decoction on.   So In that case just mash for 60 minutes starting at 156 F and letting your mash fall naturally in temperature over 60 minutes.  At the end of the mash remove 1/2 of the grains and bring them to a boil, stirring constantly for 15 minutes, then add them back into the main mash before draining, and or sparging.  So your total mash time will be close to 75 minutes.  This process is called a false decoction.  It will get you very close in terms of color and mouth feel.

That's all for today. Thanks for reading.

Tuesday, August 16, 2016

Brewday HOT VIDEO ACTION - Festbier & partigyle patersbier - Single decoction & partial mash

There are a lot of pots on a
decoction brew day.
Sunday... we were up to our usual craziness again.  It was just me and Mark Anthony, and when we brew alone, we tend to do crazy, difficult, and complicated stuff.  Now, I am not necessarily advocating that for any of you.  Especially if you are new to brewing.    But, we like to push ourselves and we enjoy trying new techniques.    So we brewed 8 gallons of beer in about 5 hours.  Both beers were decocted...

We brewed a festbier.  A medium gravity lager that is served at October fest in Germany.  I have written about it before.   It is a fantastic German Lager.  We will be using the fast lager method described on brulosophy.   This beer needs to be step mashed or decocted to get the malty profile and mouth feel that you want in a festbier.   So that is exactly what we did.  But we were using grains from Cargill.  Europils, and Muesserdoerffer Vienna, so we didn't feel the need to do a tripple decoction.  We knew we would get the conversion we were looking for from a single decotion and from a good amylase rest.  We love these grains, and they convert like a mother.  The extraction is always good even in a single stage mash.

We started with a brief enzyme wash at 132 F, for 15 minutes.   That is more than enough time for the enzymes to wash into the wort.    At the end of the enzyme wash we pulled a 2/3 rds decoction and started the crazy process of decocting our mash.    The video below does a pretty good job showing you the decoction process.   Apologies in advance for bad lighting and for my rant 2/3rds of the way through.

Checking the strike temp for the
festbier.  The water is treated.
From there on the festbier was easy, two hop additions, nutrients, and Irish moss.    Neither of these beers are very hoppy, so we used the "no chill" method.   We generally prefer to chill our batches but today, time pressures of normal life meant we would just no chill.   I have never had a problem with "no chill" especially for batches that are not hoppy.    We hit our gravity and we let it chill.   Mark Anthony is taking the batch to Johns tonight to put it into the fermentation chamber for the fast lager method.

rapid boil on the cajun injector
So we had these grains, that had only been decocted once,  they are awesome grains and there was still some sugar in them, 1.013 to be precise.   That is pretty low.  But a patersbier is a low gravity Belgian beer.   If you are not familiar with patersbier, it is a low gravity beer made by the monks for daily consumption.   It is not a blonde ale, or a belgian single.  Although, recently there has been a push to call it a belgian single.   It is made with abbey yeast, not belgian ale yeast.    And most importantly it is delicious.    We knew a pound of pilsen DME and a boil would fix that.

There was a problem with our color... it looked like... ZIMA,  or for you youngsters... a mikes hard lemondade.  It was just too light in color.   Well we know how to fix that.... another decoction.   So I took the grains, put them in a pot and started a decotion.   30 minutes later we had a malty aroma and a wonderful color.   We added the grains in a bag to a bottling bucket and then we poured 4 gallons of treated water at 168 F onto the grains.    A bag and a bottling bucket might be the best way to do a partigyle.   It was so easy.   Think we'll post a video of this process next time.   The batch was brought to a boil on the stove and usual brewing practices took place.  We added Saaz hops at 60, 30, 15, and 0.  Irish Moss and yeast nutrient at 10 minutes.    The final gravity was 1.044, which is a little high for a patersbier.  But it will be delicious.

And for those of you who doubt that we can get a rigourous boil on the cajun injector, here is an older video of a 6.5 gallon wort boiling.

Wednesday, June 15, 2016

Gather your stuff it's time for Ooompah! German festbier!

haben sie gehort das deutsches band?
Ok,  so believe it or not, it is time to start getting ready for fall.  And fall means bigger bolder beers.  Fall means darker heavier beers, and fall means... Oktoberfest right?   Well yes, and in truth.... No.  The Germans don't really serve Maibock at Oktoberfest anymore.  Well they serve it, but it isn't the main beer they serve.  And I have it on good authority if you want a Mass of Oktoberfest, you have to get up from your picnic table and walk over to the bar where they are pouring other beers. And who wants to leave the picnic table in the meadow tent and do that?  The main beer they serve is called Festbier.  Festbier literally means Festival beer. It is the deep golden (but not amber) colored low alcohol beer you see in the pictures of the beer tents.  Festbier has a malty malty taste, a medium body, balanced hops, and a clean finish. There was an excellent article on Festbier in the Jan/Feb 2016 edition of BYO by Gordon Strong.   I am assuming you all know who Gordon Strong is... no? ok...

All Hail Gordon Strong.
Well then, let's back up a minute.  Gordon Strong is BYO's (brew your own) style columnist.  He is also the president of the BJCP, an award winning brewer, and the highest ranking beer judge in the world.  He won the Ninkasi award 3 freaking years in a row. In his books he teaches and talks about realistic techniques for brewing better beer at home.  The fundamental idea, is that styles are generated by the people who brew.  10 years ago American Strong Ale was not a style.  But people kept making it and the BJCP studied it and added it. Gordon Strong is a realist, he is the ultimate beer geek. He is our king, you owe him your allegiance.  His style columns are meant to inform you about a type of beer you may want to experience.  So check out his books and columns, they're truly great.   And in the January / February issue of BYO he uncorks one hell of a recipe, and of course he makes it easy.

Believe it or not, these frauleins are holding beers.
I can't quite make out the beers, but I have been assured
that they are in the photo somewhere.
In fact, he makes it too easy.   But have no fear our somewhat regular and loyal readers.  We'll fix that with our usual dose of complicated absurdity. We'll be influenced by Gordon's recipe but we'll be changing the grain bill slightly and doing a triple decoction mash. Our goals; have fun, add richness, add mouthfeel, and obtain the almost tawny golden color you see in the photo of the frauleins at the left side of the page  We're posting the recipe early and the ingredients and equipment you will need in hopes that many of you will join us in our quest to make this great fall beer. We will be doing a no sparge, triple decoction.  And of course we'll be using the fast lager method because...well why the heck wouldn't you?  If you want to lager it for months be our guest. There is nothing wrong with that practice. Does the beer improve with extra cold storage?   Yes, probably. maybe... in truth we have no idea, we drink it before it ages.  But by using a fast lager fermentation you can still lager part of the batch in your keg, or in bottles.  And you can start drinking some of the beer sooner.

Yes, sports fans she is also holding
beers, I know it is hard to see them.
But with the trained eye, you can
make them out.  I think these might
be traditional Marzen!
Oom-pah!
6 gallons (5.5 to ferment, 5 to package)
1.054 OG
1.012 FG
6 SRM
5.5% ABV

7.6 lbs of Pilsner
4.4 lbs of Vienna (no munich? nope, were doing a decoction)
.25 lbs of Flaked Barley - for head retention, it works, try it.
0.5 oz  of Magnum at 60 minutes  14,7% AA,  7.35 AAUs
0.8 oz  of Hallertauer Mittlefruh  2.2% AA, 1,76 AAUs
1 Package of Fermentis 34/70
1 tsp of yeast nutrient at 15 minutes
1 tsp of irish moss at 15 minutes
1 tsp of unflavored gelatin - for fining the beer.

Decoction schedule - 

  • Enzyme Wash - 132 F - Calculate your needed strike water temperature
  • 1st Decoction- 146-148 F - Pull a thick 2/3rds decoction, rest at 150 F for 10 M, then boil for 10 M Return to raise the wort to 146 to 148 F.  Hold for 1 minute, stir, then pull 2nd decotion
  • 2nd Decoction - 156-158 F - Pull a thick 2/3rds decoction, boil for 10 M Return to raise the wort to 156 to 158 F.  Hold for 1 minute, stir, then pull 3rd decotion - Schluss Decoction (Schluss means conclusion or final)
  • Schluss Decoction - Pull enough grain free wort from your mash to raise the temperature of the mash to 168 F.   You'll have to do the math on brew day.  I use brewers friend calculator for infusion step mashing.   
  • Vourlauff - We vourlauff the entire volume almost like a fly sparge, it gets all the chunkies out. And we use an extra brew bag... so do please stay tuned for our brewday videos and post, you're gonna love it!  
Boil - Described above, but boil hard


Fermentation schedule - 

  • 7 days at 52 F We may also add fermaid K at day 3 of fermentation to ensure the beer finishes clean and crisp.
  • 3 days at 68 F
  • 1 day at 50 F (add Gelatin)
  • 10 days at 34 F
  • Package, and store the beer cold.  It does get even better with time, but it's pretty damned good, how it is.


Saturday, May 28, 2016

Hot Video Brewing Action... the French Country Ale Brew Day

You'll know you are becoming a great home brewer when you can adapt on the fly and still nail your; gravity, color, and volume.  That is just what Mark and I did today.  But let me back up and explain what happened and how we got to where we wanted to be.   And congratulations to you for reading this blog today, because today and today only we will reveal a great secret tool for making decoction easier. 

The plan today was very straight forward.  We intended to brew a french country ale.  A rich, malty, high alcohol, luxurious country ale.   Not a saison and not a farmhouse ale, a french country ale. The recipe was inspired by "Farmhouse Ales" by Phil Markowski. In the book, Markowski explains that most of the Biere de Garde beer in France is actually brewed with clean ale yeast. Not with Saison or Monastery yeast. The idea of turning Biere de Garde into an estery Saison, or spicy, phenolic beer is an American idea.  Well that struck a chord with us.  So we planned the recipe, we knew we were going to make 3.5 gallons and take 3 gallons to the fermenter.   We knew we were going to step mash and do at least one decoction.  We knew what our color was going to be, or what it was supposed to be.   And then we started brewing.  And that's when everything changed.  The color wasn't right, the wort was delicious, but not decadent.  We had to do something to get the beer we wanted. 

But fortunately for us, and for you our somewhat loyal readers, we have prepared ourselves for just about any brewing situation.   And we knew just what to do to get the beer we wanted. 

We started with a betaglucan rest at 119 F.   We were actually shooting for 116 F, but I recently filled the cavity of the Cajun Injector Electric Turkey Fryer with ceramic foam, and boy oh boy does it hold heat now.  Listen to me round eye, when you make changes to your system, you will have to learn your system all over again.  There is virtually no heat loss on a small high gravity (high grain) batch of beer.  That is exciting, that means we can hold temperature on our mashes in the future with out any problem.   

Our next rest was supposed to be at 132 F, but we were not impressed with the color at all, and so... we decided to pull an additional decotion.  Rather than doing a single decoction to go to mash out, we were now doing a double decoction. So we pulled the grains and let the element in the kettle raise the main mash slowly to 146 F.  Slowly, was the key, by going slowly we went through the protinase rest as well. Mark kept a close eye on the main mash while I handled the first decoction.  And by the way, we used Vienna Malt by Muessdoerffer.  Amazing stuff, after the first decoction the wort tasted grainy, and bready, with slight caramel and nut notes. 

When we returned the decoction to the mash we raised the temperature from 146 F to 154 F. But we had an ace up our sleeve.  While we were decocting we added a second bag to the kettle and we scooped the remaining grains into the bag... When we poured the decoction back into the kettle we poured the decoction into this second bag... By now you know we were up to something.  And here it is.  A second bag is a great help in a decoction.   This is a great technique,  we hope you'll give it a try. 

With the help of the bag we were able to easily pull a thick mash decoction for mash out.  Mark handled this decoction while I started weighing hops and additions, and updating the brew log. The second decoction, gave us even more richness, and a beautiful color.   We added the decoction back into the main mash when we both thought the color was where we wanted it.   When we added the decoction back in, our temperature came up to 166 F.  So we turned on the element and rose to 170 F. for 10 minutes. 

We then pulled the bag, set it on a colander over the kettle, vourlauffed the entire volume of wort, and sparged to a volume of 4 gallons.  We generally only lose about .5 gallons an hour in the electric turkey fryer.  Our Gravity was 1.060.  Perfect.  The sugar addition and the boil would take us to 1.074.  

The boil was uneventful standard home brewing stuff.  We added Northern Brewer as a first wort hop,  Mt Hood for flavor, and Styrian Golding for Aroma.   We added Irish Moss, and Yeast Nutrient.   At the end of the boil we drained the wort into Mark's 5 gallon kettle, chilled in the sink, in an ice bath.   Once we were at temperature we poured the wort back and forth between Mark's kettle and the fermenter.   This is an easy way to aerate.   Our gravity was 1.074.  So we pitched 1.25 packages of Fermentis K-97, Kolsch yeast.  

Lots of yeast, a rich healthy environment, lots of nutrient, lots of aeration... this beer should be amazing.  Really looking forward to trying this one. 


Friday, May 27, 2016

Advanced Mashing for advanced results

This is a beer for the common man of France,
The French country ale shares it's heritage with
Biere de Garde, but unlike BDG doesn't need
long periods of lagering to finish malty and clean.
John is out of town for the Holiday weekend.  So that leaves the rest of the Counterbrew team to carry the torch. The infusion mash Tripel will have to wait a week.  So we're brewing at Mark's this weekend. We are making a french country ale, not a saison, not a farmhouse ale.  This beer is not yeast centric. It's a rich malty clean country ale. If you want to get technical this is a Biere de Garde.  But it doesn't really need to be lagered because we are using K97 Kolsch yeast.  It will be clean at packaging.   We will be step mashing  8 lbs of grain in the turkey fryer, then pulling a decoction to raise to mash out, adding even more malt flavor and color.  It's going to be a lot of stirring, but we are up for it.  Stirring?  Yes, stirring.  When ever you are doing a step mash, and applying direct heat, you should stir your mash.   Your goal is to keep the temperature consistent through out the mash and to keep the areas close to the fire from over heating. So if the element is on, we are stirring.

What?  You can't use a spoon to keep temperatures consistent, you have to have a eHERMs, recirculating wort, blue tooth controlled wort production machine!

Well yes, yes you can use a spoon.  I can and do all the time.  It's just home brew.  You can do what ever you want.  And I want to brew 3.5 gallons of a french country ale with a luxurious malt profile and mouth feel.   And they way you do that?  You step mash, and you do a decoction.  Both techniques have been covered ad nauseum on this blog, recently.  So I won't get into too much detail on that today.

Wait a minute, hold on now you're brewing a weird size.  What the holy heck?  Why can't you just do things the way the beer police say to do them? 

Well in truth, at Mark's we dont want to make a 5 gallon batch.  He lives in a loft.  We don't want to carry beer from the kitchen to the laundry room for chilling.   So we make a smaller batch and chill it with an ice batch in the sink.

This weekend we will be showing you that you can combine techniques.  They are just tools.  And we'll be applying the knowledge we have built with you on this site to use step mashing and decoction,

So here is the recipe, and the process.  Just in case you want to brew along.

color will be
somewhere
between these
Belle Terre - 3.5 gallon biere de garde - really a french country ale.
1.074 OG
1.014 FG
24 IBUs
11 SRM - may be slightly higher due to the decoction
7.9% ABV

5.5 lbs of Vienna Malt -
the longer
you decoct
the darker
the color
.75 lbs of Munich
.75 lbs of C20
1.0 lbs of Table Sugar
.50 lbs of Aromatic
.50 lbs of Biscuit

.6 oz of Northern Brewer at First Wort  9% AA = 5.4 AAUs
.5 oz of Strisselspalt at 25 Minutes to go in the boil 4% AA = 2 AAUs
.5 oz of Strisselspalt at 10 Minutes to go in the boil 4% AA = 2 AAUs

1 tsp of yeast nutrient

Fermentis K97 Yeast 2 packages.  Added Dry to chilled wort

The Mash
The grains will strike into 4.5  Gallons of 120 F water - The grains will rest at 115 F for 15 Minutes
The mash will be stirred and heated to 132 F - where it will rest for 15 minutes
The mash will be stirred and heated to 146 F - where it will rest for 30 Minutes
A decoction will be pulled and brought to a boil for 15 minutes  no need to rest at 150 -
The decoction will be added back into the main mash to raise the temperature to 168 F.
The grains will be pulled and set on a rack above the kettle to drain. squeeze to get to volume.
The pre boil volume should be about 4 Gallons.

From here on out it is just like any other batch.

Wednesday, May 18, 2016

Easy Decoction... no additional time... 2 part decoction step mash

There is a reason real
Bohemian and German
Lagers are made with
decoction mashing.
Wow, and thank you all for the amazing response to the decoction series.  The questions and conversation sparked on Facebook, and on Google+ have been fantastic.  We have some more decoctions coming up.

Sunday's brew was a traditional tripel decoction.  We skipped the proteolytic enzyme rests.  They do help with breaking up proteins and with head retention.  Many brewers report creamy meringue like heads from decoction.  This is especially true when you include the acid and protein rests.  In a couple of weeks when we do the bohemian pilsner, we'll do the full totally geeky process begining at 95 F, then we'll do infusions to 110 F and 132 F, and then a triple decoction. We'll use minimal chemical additions.  Should be exhausting, should be fun, and should make some world class beer.   But you have also heard me say over and over that decoction is just a tool.  A tool you can use to improve your beer.   We also do decoctions on lots of different styles of beer, and we have developed a simple two step decoction process.

Today in an effort to make clear our easy two step decotion or "Easy Decoction"  I am writing the process and posting a recipe for a hoppy pilsner.  You must have temperature control to make this recipe. If you do not have temperature control, then I would suggest using Fermentis K-97 yeast. Fermentis K-97 is a Kolsch yeast.  It produces minimal esters, 23 ppm.  It will be very close.  But you will have to fine the Kolsch yeast with gelatin, or another fining agent.  They are notoriously bad flocculators.   The good news is this is a process you can use to make any style of beer, but works best for all German Lagers,  Belgian Ales,  American premium lagers and any beer where you are using under modified grains.  (anything called floor malted or organic benefits from decoction, although I would recommend multiple rest for these malts, acid, protein, beta, alpha mash out )

Decoction is no big
deal.  You can do it!
Our Easy Decoction method does not add hours to a brew day, the additional time is around 30 minutes.   That is half an hour more time to dramatically improve your beer.    I hope this is helpful to you all.   More than anything I hope you come to understand that decoction, and infusion mashing are just tools.  You can use them to improve your beer.  You can use them because they are fun.  You can use them separately, or you can use them together.   In a later post, we will make a Bohemian Pilsner where we actually use infusion step mashing and decoction.  Of course no technique can replace the importance of good sanitation, and proper fermentation.   So if you are having issues with off flavors, you need to work on those techniques before you worry about decoction, infusion or partigyle.  Here is the other great news, you do not need to have fancy gear, pumps, or recirculating anything in order to make great beer with these advanced techniques.  And nothing will get you more in touch with your beer than these hands on brews.  

You can also use these techniques for small batch.   I love small batch brewing. Standing at the stove channeling my inner Belgian Monk or German brewmeister.  I brew far more often than you see on this blog.  I am always screwing around with something.  I usually brew 2.25 gallons when I brew small.

Ja Whol! - inspired by Pivo Pilsner.

OG 1.050
FG  1.012
Color 4 - 5 SRM - your recipe calculator will say 2 srm. The decoction adds the color.  Decoction also gives the beer a shimmering brilliance.

IBUs - 58
ABV 5%

Grist
9.5 lbs of Pilsner -  we recommend Weyermann Barke Pilsner or Cargill EuroPils

Boil Additions
1 oz of Magnum at 60 minutes - 14.7% alpha acid = 14.7 AAUs
2 tsp of yeast nutrient at 15 minutes
1 tsp of Irish moss at 12 minutes
1 oz of Spalt Select at 10 minutes  5% alpha acid = 5 AAUs
1 oz of Spalt Select at 5 minutes   5% alpha acid = 5 AAUs

Yeast
Fermentis 34 / 70 two packs (if you can't lager then use Fermentis K-97, one pack)

Dry Hop
2 oz of Hallertauer Saphir for 5 days.3.2% alpha acid = 6.4 AAUs (LHBS may just call it Saphir)

Mash procedure;   Our mash is very thin, often no sparge or very little sparge.   It works fine.
  • Rest at 146 for 20 minutes
  • Pull a decoction of 1 quart per pound of grain. 
  • Put decoction into a separate kettle. 
  • Rest decoction at 150 F for 15 minutes then bring to a boil for 15 minutes stirring constantly.
  • Return decoction to the main mash, temperature should rise to about 156 F.  
    • The mash temperatures are not as big a deal as you think.  As long as alpha amylaze is activated by your second decoction you are fine.   Don't exceed 165 F.
  • Rest for 10 minutes
  • Pull the thin mash decoction through your valve.  Pull enough thin mash to raise the temperature to 168+ F. 
  • Bring thin mash to a boil and then return it to the main mash.  The temperature should come up above 168 F.  
  • Mash out rest for 10 minutes. 
  • Boil and make additions as normal.  Watch for boil overs when ever you decoct. 
Dry yeast, especially
Fermentis 34/70 is a
great yeast for lagering.
At the end of the boil chill to fermentation temperatures and aerate.  This is a lager, so you will need to use additional yeast and lots of aeration.   We generally chill to as low as we can with our Jaded Hydra and then put the fermenters into the chamber to get them to pitch temps.   The next day we aerate and pitch the yeast.

Here is another shocker...we prefer dry yeast for lagers.   Dry yeast is packaged with oxygen and nutrients.  So we don't even rehydrate.  We just pitch the yeast right on top of the aerated wort.   We use the fast lager method so many of you have read about on Brulosophy.   Because we aerate the next day, we generally ferment in plastic buckets.  We aerate with a sanitized paint mixer.  Say what you want, 5 minutes of this gives plenty of O2 for the yeast to use when using dry yeast.  Since we use the quick lager method we are not experiencing any oxidization from the buckets, the beer isn't in there long enough to oxidize.   We generally go 10 days at 52 F, then 10 days at 68 F, then 10 days at 34 F.   It makes clean crisp perfect lagers. 

Fermaid K can help your yeast
finish strong.  Remember it's all
just yeast.
If fermentation gets stuck, which can happen with a lager,  we add fermaid K yeast nutrient and swirl gently.  We dont want oxygen at this point. Gently swirling gets the yeast back up into suspension.   We have had great success with this method.  Jake took a beer that was stuck at 1.030 and got it down to 1.018 by swirling gently daily. 

The total time for the decoction mash will be around 90 minutes.  A full on triple decoction usually takes us around 2 hours and 20 minutes.   So this is way faster than a traditional decoction mash.  And way more fun than just sitting around in the garage during the mash.   

I hope you will give decoction mashing a try at some point.  It really is a ton of fun.  And it improves your beer.   And this recipe is fantastic.

Monday, May 16, 2016

Triple Decoction Munich Helles - Home brew geekery

He can't carry anything, but he can
damned sure grind the grains!
Warning fellow brewers, don't
leave pilsner near John.  He eats
it like pop corn... all day.
Sunday was a beautiful and peaceful day in KC.  A gorgeous day to brew.   Brewing with a team is great.  There are things you can not do by yourself that you can do with just a little help from your team.  Our team is spread out right now.  Jake was at the TPC in Jacksonville.   Mark is still in Brazil and John is hampered by a torn Achilles tendon right now.   But there is still a lot he can do.   Fortunately for us, John's lovely wife stepped up and helped a lot.  (Thank you Beth).

So Sunday, John and I set out to brew a triple decoction Munich Helles with Cargill Europils.   Europils is grown in Canada, but made following traditional European practises.  We think it is fantastic stuff.   Our hops were BSG small package Hallertauer Mittlefruh.

Our goal was to stick to traditional brewing as much as possible, and to make things easy as possible.

We used no water treatments other than camden to knock out the chlorine.   The pH adjustment was made with 1lb of acidulated malt.  Our pH after dough in came in at 5.44.  The wort tasted amazing.   I am not saying we are committed to this approach all of the time.  In fact, I would say generally we will make full water chemistry adjustments.   But today, John and I were geeking out and channelling the wisdom of the German brewers of old.

Silicone gloves are a must have
for a decoction brew day!
In fact,  I would suggest
that they are a must have
for all BIAB brewdays!
We let the grains rest for 15 minutes at 132 F before pulling our first decoction.  This is called the enzyme wash.  It allows the majority of the enzymes to get into the liquid.  Our trusty 1 quart metal mesh strainer broke, So we had to use a pitcher to remove the grains from the mash tun.   I strongly suggest that you, use a mesh strainer.   If you don't have a mesh strainer, just go get one, and know that if you decoct a lot, you will be replacing it once a year.  Using a pitcher was such a pain in the ass, and on a brew day you know is going to be long, it just isn't worth it.   But we made do.  The first decoction rested at 150 for 15 minutes and then was heated to a boil.  Jake's jet burner makes quick work of decoction heating.   Beth, John, and I took turns stirring the decoction boil for the 15 minutes.   And then the entire decoction was returned to the main mash.  The temperature rose to 145 F.  I do need to say, if you do not own silicone gloves, you really need them for a decoction brew day. You will be lifting heavy kettles full of boiling grains and wort.


Decoction Mashing, what it looks like.


We rested at 145 F for 15 minutes and then pulled our next decoction.  The second decoction is faster. You really don't need to rest at 150 on the second decoction.   You can proceed straight to the boil. Once again Beth, John and I all took turns stirring for the 15 minutes.   The second decoction, really all decoctions will seem really dry when you first put them in the kettle.  But they will give off the wort as they come to a boil.   By the time you are done with the decoction it will be soupy.   So don't worry just keep stirring.   We returned the decoction to the main mash and rested for 20 minutes.  The temperature rose to 155 F.


After 20 minutes we pulled a thin decoction.  Now, what the heck is a thin decoction?  It's just wort.  We pulled 4 gallons of wort from the mash and brought it to a boil.  When it boiled we poured it back into the main mash for the mash out.  The temperature rose to 170 F.   We rested for 10 minutes and then collected 11 gallons of wort for the boil.  You can use this techniqe for any mash out.

Our target wort gravity was 1.034.  We were at 1.042.   So we overshot again, but we were with in a reasonable tolerance.  The proteins kept building during the boil.  Even with Fermcap S we almost had boil overs.   I know that decoction completely unbundles the proteins, I'm sure this has something to do with our results.  Hallertaurer is low this year 2.5% alpha acid. So we added  .6 oz of warrior at 60 minutes, just to get our bittering where we wanted it. We added 1 oz of Hallertauer at 60, .6 oz of Warrior at 60, and 1.5 oz of Hallertauer at 5 m.  The beer was chilled to ground water temps of 57 F with our Jaded Hydra Chiller.  We let the chiller run for 10 minutes to get to 57 F.  next time we'll set up a final chiller with a sump pump and the old immersion chillers.  Just get a hydra.  Don't whine about the cost, it's the best money you will spend.  We can chill 10 gallons from boiling to pitch temps in about 6 minutes.

Rigorous Boil.  That was Jake's nickname in college


The boil was too rigorous we ended up collecting only 9 gallons of wort, at 1.068 OG.  4.5 gallons in two plastic fermentation buckets.  The simple solution was to add a gallon of spring water to each fermenter.  The beers were placed into the fermentation chamber which was set to 52 F.   After work tonight I'll be swinging by aerating, and pitching the yeast.   We are pitching 34/70 into one of these, and S23 into the other.    That way we can compare the two Fermentis yeasts and decide which one we prefer for this beer.

Overall this was a really fun and fantastic brew day.  I'll admit, I love decoction.  It is a blast.   And it doesn't have to be intimidating.   And it isn't just for german brews.  You can, and we have, add a decoction to your favorite ipa recipe and really create a great malt backbone.  Now, I know a lot of you will argue that decoction is not necessary.  And to you I say... you are correct.   You can make really fine beer with out decoction.   I know a lot of you will argue that decoction makes no difference, and to you I will say... you are just wrong.   It makes a tremendous difference in color, mouthfeel, and in taste.    So I encourage all of you to give it a try.  You wont be disappointed.

We have some exciting brews coming up.   We have a full team triple decoction Pilsner Urquel clone coming up.   We will be making our amazing tripel, because we are out of it and we all want more.  But we will be making it in a 10 gallon batch.   Then we will be making the fall beers.   A festbier (easy decoction), a BSDA, and for Beth a pumpkin beer.  Then our focus shifts to winter beers.   So by mid to late summer we will be making a fall Saison, and some great big Stouts for winter consumption. But don't fret sports fans, Mark and I will keep making some weird small batch stuff, wine, and sours.  So keep checking in.


Wednesday, May 11, 2016

This weekend's recipe... triple decoction Munich Helles

If you'll direct your eyes to the beer...then you'll notice
It is certainly not a 1 or 2 SRM beer, more like 3 or 4.
So there is a change to this weekend's  triple decoction recipe.   We are making a Munich Helles rather than a Bohemian Pilsner.   We all just decided that a Munich Helles would be more delicious during the hot summer here in KC.  And since Mark is out of town, and Bohemian Pilsner is a special favorite for him, we are switching to a Helles.

So this weekend we are brewing a 10 gallon munich helles with triple decoction.  A very traditional approach to this beer.   A lot of Munich Helles only have one bittering charge of hops, but we are updating the recipe with a late addition as well.  While this beer is certainly not hoppy, we still want it to taste and smell like beer.


We will be following our easy decoction method.  Our first rest will be at 132 F, we are skipping the protelytic rest on this one.  I am not convinced that modern malt benefits from it, and since we brew with very thin mash (often no sparge), the protelytic rest is somewhat ineffective.   So we'll enzyme wash at 132 and do a brief rest of 15 minutes before pulling the first decoction.  The first decoction will take us to 146 F, the second decoction to 154 F.  The final decoction will be a thin mash decoction (only wort no grains) it will take us to mash out.

The main thing I want you all to get from this brew session is that decoction is a tool that you can use to improve your beer.  Decoction can be used to step mash, to improve the clarity and mouth feel of your beer, and to correct temperature when you dramatically undershoot a rest temperature  (a quick note; there is no reason to correct mash temperatures that are with in a couple of degrees RDWHAHB).   It isn't rocket science, it is just a tool.  In fact, it is the opposite of rocket science, it is a very old technique.  So here is the recipe;

This is what a quiet hero looks like
The great Munich / German composer
Richard Strauss.
Quietly Protected his family during
the Nazi Regime, and preserved
great German Music written by Jews.
Ein Heldenleben-  (A Hero's Life)
10 Gallons
1.048 OG
1.015 FG
21 IBUs
3  SRM
4% ABV

16.5 # of Pilsner Malt (we are using Europils by Cargill)
1.00 # of Munich Malt

2.5 oz  Hallertauer Mittlefruh 4.4% AA  11 AAUs  @ 60 Minutes,  should contribute 20 IBUs
1.0 oz  Hallertauer Mittlefruh 4.4% AA  4.4 AAUs @ 5 Minutes,  should contribute 2 IBUs

Fermentis 34/70 3 packages. Rehydrated in 1000 ml of 1.035 wort during the brew day.

2 tsp of yeast nutrient at 15 minutes
2 whirlflock tablets at 10 minutes

The mash schedule triple decoction.

  • Rest at 132 F for 15 minutes 
  • Pull thick decoction 2/3rds. rest decoction at 150 F for 10 minutes, then bring to a boil stirring constantly, for 15 minutes. 
  • Return decoction to main mash add scoop by scoop till main mash temperature is 146 F.  cool the remainder of the decoction to 146 F then return to mash. 
  • Rest for 10 minutes then pull another decoction... rest, boil  return to the main mash scoop by scoop until the main mash is at 154 to 156 F  cool any remaining decoction to 156 F before adding to main mash.  
  • Rest 15 minutes.  Pull a thin (schluss) decoction large enough to create a mash out. 
  • Boil and add hops / extras.
  • Chill to lager temps before pitching 3 packages of rehydrated 34/70 yeast that is also at lager temps. 
  • Aerate this wort thoroughly before pitching yeast.  (if shaking, 3 to 5 minutes minimum)
21 day lager Fermentation schedule - you dont need 3 months to make a lager
  • 7 days at 50 F
  • Raise temperature to 65 F (Raise temperature 8 F at a time)
  • 7 days at 65 F
  • Lower Temperature to 35 F (Lower temperature 10 F at a time)
  • 7 days at 35 F
    • Add Gelatin Fining when beer reaches 55 F
    • After 7 days the beer should be clear and ready for packaging. 


Thursday, May 5, 2016

Trippe Decoction Bohemian Lager... is this the ultimate home brew geekery?

This is real Budweiser by Budvar
Brewery.  Bohemian Pilsner
So, here at Counterbrew we are blessed to have some great sponsors.  Certainly a lot of the brewing we do would not be possible with out the support and advice of the good people at Fermentis, BSG, Cargill, and Jaded.   One thing we do not do is a lot of experimentation and side by side comparison. There are already sites doing that, and quite frankly they do it damned well.   Brulosophy.com  What we do try to do is show you some easy ways to make great beer at your home, in your garage, or on your kitchen counter.   And certainly this coming weekend, I will be making and posting a very easy recipe for a great, simple blonde ale.   If you have never brewed all grain, this will be a good one to check out.  I'll be making Biermunchers Centennial Blonde.  My fathers favoirite summer beer.

The gold standard of Bohemian Pilsner.
But,  then next weekend.  We will be brewing one of the most desired and complicated brews a home brewer can tackle.  We will be brewing a triple decocted hoppy Bohemian Lager.  And we will be doing it the easy way.   It will be Grand Master Jake and me on the brewing, and John at the computer controls for this one.   His first time taking the reigns of the brew log, and piloting the ship.  (actually he has a broken wing right now and really can't stir a decoction for 15 minutes).   To make it even cooler, we will be using the quick lager method.  Mark Anthony is on assignment in Sao Paulo.

In that session we will be showing you how you can easily incorporate decoction into your brewing routine.  So if you have ever wondered about decoction this will be the post to follow, coming up in about 10 days. If you have ever wanted an illustrated, and partially video guide to decoction this will be your post.  I am posting about this early in hopes that those of you who want to try it have time to get your ingredients together.

Jake stirring a mash
out decoction.
I have written about decoction before.  It is one of my favorite home brew methods.  Basically you remove a portion of the mash, and bring it to a boil for 10-15 minutes then you return it to the mash, raising the temperature to the next rest.  You can do 1, 2, or even 5 decoctions if you want.  But most would tell you returns are diminishing after 3 decoctions. Kai Troester, the Braukaiser has posted fantastic videos, and information on his website.  Braukaiser.  Kai's work is so well respected and his process and techniques are so refined that he is often quoted and referenced by leading journals, blogs, and even the major brewing magazines.  If you are a very detailed, precise person, you may enjoy his approach to decoction.   Or you may find our dump it and don't worry about it approach much easier.  Both produce great beers.   No matter which method you prefer,  I strongly suggest you watch this Brewing TV video before you brew.


Soldier Svejk - Triple Decocted Bohemian Pilsner
The Good Soldier Svejk is a Novel
Beloved  by the Czech People.
If you've never read it, it is worth
your time.  Set in World War 1.
The novel displays the author's frustration
with the war, the ruling class, and the
absurdity of the entire situation through
the incompetence (feigned?) of the Svejk.

5.5 Gallons
OG 1.050
FG  1.015
ABV  4.6%
IBUs  44
SRM  3-4  (your software will not adjust for the decoction, trust me it is burnished gold in color)

8.5 # of Pilsner (we are using EuroPils by Cargil)
.5   # of Carapilsner added after you pull 2nd decotion

(remember saaz very wildly in AA% were using 3.75% here)
2.0  oz of Czech Saaz @  75 Minutes
1.5  oz of Czech Saaz @  30 Minutes
1.2  oz of Czech Saaz @  15 Minutes
1.2  oz of Czech Saaz @  0 Minutes

Whirlflok Tablet at 12 Minutes
Yeast Nutrient at 10 Minutes

Rest at 132 for 10 to 15 minutes, this is the enzyme wash  Pull a thick decoction, about 2/3rds of the grain.  Rest decoction at 150  F for 15 minutes, Boil Decoction for 15 minutes.  Return to mash one scoop at a time until mash is at 146 F.  Let any remaining decoction chill to 146 F.  You can add some of the wort from the mash to help it cool.  Rest entire mash for 10 minutes then Pull 2nd decoction.  Bring decoction to 150 F for 5 minutes, then brng to a boil for 15 minutes.  Return the decoction to the mash one scoop at a time until mash is at 154 F.  Let any remaining decoction chill to 154 F.  You can add some of the wort from the mash to help it cool.  Rest for 10 Minutes.   Pull thin mash decoction adequate to raise the temperature of the main mash to 168 F to 170 F.   Probably around 3.4 Gallons of wort.   Bring to a boil then add back into mash to raise the temperature to 168 F.    Drain into boil kettle.

75 Minute Boil.  Add hops as indicated.

Your cold break may look like egg drop soup,
don't stress, it means you did a good job with
your decoction.  It will all settle out. 
Chill to 53 then pitch 2 packs of Fermentis 34/70 yeast.   (the cold break will be insane, it may look like egg drop soup, do not let this worry you.  It just means you did a good job with your decoction)

We can get pretty close to 53 with the Jaded Hydra, but we have to finish the final couple of degrees in the fermentation chamber.

The quick lager method... Yes it works just fine, so don't argue about it.

7 Days at 53 F
Ramp up 5 F every 12 hours until the beer is between 65 F and 68 F
Allow beer to finish 10 days is a safe plan to follow
Ramp down 5 F ever 12 hours till the beer is at 30 F to 35 F (Add gelatin finings when the beer is at 50 F for super clear beer).
Allow to "lager for 7 to 10 days
Total time  is about 26 to 30 days.
Package as you normally do... for us that means bottling.