Showing posts with label Infusion Step Mash. Show all posts

Friday, October 28, 2016

A beer geek guide to step mashing - Even more advanced information.

"Enzymes are the real control panel of mashing." -  The great and powerful Brewer X

The most common questions we field on this blog are related to step mashing and I know it can be confusing. We clearly have touched on something with this topic. To be honest I am surprised that more of you don't know more about step mashing.  After all, in the old days we had to step mash. We have written about this process a lot, but it is important to go back and clarify some things and to review what we have learned already.

In this modern home brew world you have been taught that mash temperature is a dial that you can turn up or turn down in order to create the wort that you want to create. Turn it up to create more mouth feel; turn it down to create more fermentability.  You have been told that modern well modified malts do not need a multi step mash, and that it is kinda a waste of your time to do a 2 hour multi-step mash... and I am here to tell you... all of those statements are kinda true.  Kinda, but not entirely true.

"What? OK, once again I got on your blog and you are giving me almost truths, and cloistered mysterious statements, just tell me what to do..."

Ok, I will tell you what to do. The first thing I want you to do is, quit looking for absolute procedures and rules. Intstead.... Learn.  Brewing is 45% cleaning,  45% learning, and 10% brewing.  So the most important thing to do right now, as you are reading this blog, is learn.  Learn about the major enzymes that we as brewers use to control our mash and get the desired results.  Learn that there are so many more enzymes at work in your mash than just alpha and beta amylase.  Learn that enzymes work in temperature ranges not at absolute specific temperatures.   If you are determined to do only single step mashes... well then go read another blog today.  It wont hurt my feelings.   I've said it before I know an award winning brewer who mashes everything he brews at 150 F. (65.5 C).   Doesn't matter what style.... 150 F.  He makes grain or sugar additions to make up for what he is not getting from the mash.   Who am I to say he is wrong.   So learn what works best for you.  For me,  I enjoy step mashing and the benefits that it yields.

Here is the truth, as I understand it.  When you brew with modern well modified malt, you do not have to do a step mash.  The mash will convert just fine at the temperatures you are accustomed to using.  Higher temperatures will produce a wort with slightly more mouth feel.  Lower temperatures will produce a wort with slightly more fermentability.  But only SLIGHTLY.  As Marshall Schott, the Brulosopher showed us on Brulosophy, the difference between a wort that finishes at 1.005, and 1.014 is not reliably perceived by the human taste mechanism.

Here is why.  When you are only using alpha and beta amylase to create mouth feel, or adding grains with more proteins, you are asking sugars to do the job of medium chain amino acids, and sugar isn't very good at doing this job.  That is the problem with this approach... you can't make a highly attenuative beer with a luxurious mouth feel.  Don't argue this point, it cannot be done, once again if you don't believe me read the Brulosophy article linked above.  The human taste mechanism can not perceive the difference.  As an example, I will present our Desir Tripel.  Desir is a 1.084 OG beer,  It drops to 1.014.  That is 83% attenuation.  But when you drink it, it is luxurious and rich.  The last batch was almost too rich- almost cloying.  Comments from random tasters and BJCP judges universally called the batch sweet.  And obviously, at 83.33% attenuation, it wasn't sweet at all.  But the perception of sweetness associated with rich mouth feel pervades our community like a cancer.  (Rant warning!  We used to know better.  But we have all been brewing single mash rest so long, that we have forgotten what a rich beer tastes like.  The association of mouth feel and sweetness is a problem in our hobby.  And that is because of single step mashing.  But I'm not bitter.).  Next time we'll shorten the protein rest and increase the hops slightly.


So the temperature of a single step mash is one way you can create the beer you want.  But an even better way?  Multi-step Mashing.  But to multi-step mash you have to know what the enzymes do, and how they can help you make the beer you want.  And to do that, you have to know what enzymes are, and a little bit about how they work.

What is an enzyme?

Representation of an Enzyme
An enzyme is a protein.  A protein that works on other components of your mash.  And like most proteins that act as catalysts,  the proteins in your mash are trying to stick to another component, and change it in some way.  For our purposes, the proteins are trying to break things up.  The enzymes can work on starches, proteins, and sugars in your mash.  For the most part the enzymes that we care about in your mash are Amino Acids (most proteins are but some are RNA).  The enzymes do not actually eat away at the sugars... I know you all think of them like pac man... but they are not alive and they are not eating.  They are just proteins.  They actually bond to different sugars (based on their shapes) and break them apart.  The enzymes are hydrophilic, and they themselves change when a water molecule "bumps" into them. They then break apart the sugars, or the proteins, or the starches, to which they are attached.  (By the way, the fact that enzymes are hydrophilic is a good thing.  It is the reason we can do decoction mashes, more on this in another post)

More than one enzyme can be active at any given time.  And this is a really good thing.  That means more than one process can be going on at a time. 

A catalyst is just a name for a component of a biological or chemical reaction that creates a change of some kind.  For our purposes, the proteins are almost always breaking things apart.  By understanding what the various enzymes are and what they do, you can truly fine tune and control a mash.  Remember, brewing is not about following some exact protocol that you read on some crazy man's blog.  Brewing is about learning- learning your system, and learning how things behave on your system.  It may shock you that when I brew a hefe on my system I know that my protein rest needs to be 32 minutes.  Not 31, not 34.  32 minutes.  Why?  Because that created the exact taste I wanted, several times in a row, at my old house, with my old water profile.  Now... that I have moved, all bets are off.  I'll have to re-learn what is perfect at my new place.  For our BDSA at John's house, I think we all agree that 30 minutes was a little too much, but 20 was not enough.  So next time we will be extending the protein rest to 25 minutes and seeing how that tastes.  See? it is all about learning... and cleaning...

So the important question, what enzymes are we concerned with in brewing?

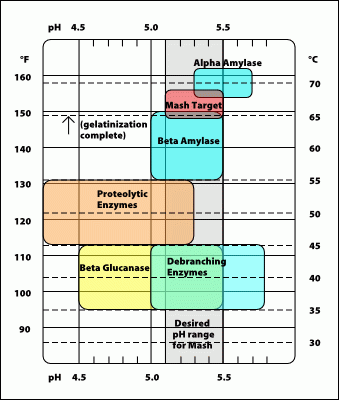
The ACID rest:  Temperature Range 95 F to 113 F,  (35 to 45 C0  Active Enzyme Phytase, Glucanase

Ok, during an acid rest there are two potential enzymes working: Phytase and Glucanase.  (And honestly you can pretty much ignore one of them).  Phytase works actively on a molecule found in grains called phytin.  It creates phytic acid which can and will lower your mash pH.  But it takes a long time (60 minutes) and really only does well in soft water.  If you ever want to do a true, rustic brew with minimal additions, this is the way to lower pH without chemicals.  It is also a pain in the ass and takes forever.  It is much easier to add some Acid, or Acidulated Malt to the grist.  

The real reason to do a rest at this temperature is to break down beta glucans (gummy gelatin gunk). Beta Glucan is a gummy carbohydrate that surrounds the starch molecule of a grain.  They get in the way of the amylase and other enzymes, and glucans are the chief contributor to chill haze in your beer.  A brief rest at these temperature ranges will allow glucanase to break down the Beta Glucans.  End result- clearer beer and slightly better conversion.  Especially important for wheat and rye.  When you do a Beta Glucan Rest your wort will be very milky, that is normal and good.    

The PROTEIN rest:  Temperature Range 113 -138 F (45 to 59 C),  Active Enzymes Proteinase, Peptidase

Why perform an protein rest?  Well, you perform a protein rest if you want to accomplish one of two things: you want more clarity or you actually want a phenolic expression in your beer.  You should view the two protein related enzymes differently.  They work at different temperatures.  Both of these enzymes are referred to as protease enzymes.  You may hear that term thrown around as well. 

Proteinase works at 131 F to 138 F (55 to 59 C) and is thought to reduce haze without reducing body.  It breaks long chain amino acids into medium chain amino acids.  You want medium chain amino acids in your beer.  They improve the mouth feel of your beer.   They can create a luscious beer that isn't overly sweet.  I for one really appreciate this quality in a beer.  If  you are looking for clarity, without a loss in mouth feel, you should consider a mash rest that maximizes Proteinase action (around 136 F). 

Peptidase works at 113 F to 128 F. (45 to 53 C)  Peptidase breaks medium chains into their components.  So if you want to express maximum esters or phenols in a Hefe weis or in a BSDA, you really should consider a protein rest around 115 F.  The key acid you are trying to maximize is called Ferulic acid.  A Peptidase rest will help you maximize it's availability.  Then all you have to do is use a yeast that is POF+ or phenolic off flavor positive.  And do not worry, if you are not trying to create these esters, just choose a yeast that is not POF+.  

Review: what we have learned so far is that a rest at 113 F (45 C), followed by a rest at 136 F (57.5 C), would be a really good idea if you want to make a very clear beer with good mouth feel and still have a highly efficient mash. 

The Saccharification Rest; Temperature range 132 F to 162,  (55.5 C to 72 C) Active Enzymes; Beta Amylase, and Alpha Amylase

Most of you are already familiar with the Sac rest.  You already are using temperatures in this range to craft your delicious home brew.  This is the main activity going on in the mash.  The main thing we are concerned with- conversion of starches to sugars.  And it happens more quickly than you may think.  Most amylase conversion is done with in the first 25 minutes.  But if you want to maximize conversion we strongly suggest you stir your mash every 10 to 15 minutes and rest for at least 45 minutes.  We have used this approach to get over 90% efficiency on Brew in a Bag, with a sparge rinse, multiple times.


Beta Amylase
Beta Amylase only works from the ends of carbohydrate molecules.  Beta amylase is active from about 132 F (55 C) to about 151 F (66 C).  A long rest at optimum beta amylase temperatures can produce a highly fermentable wort that will finish dry.  It works by breaking the first bond of a carbohydrate molecule.  It literally breaks a carbohydrate into two sugars (maltose) at a time.  Beta amylase is present in every seed or grain.  Alpha amylase and the protease enzymes are not present prior to malting.  That is in fact why we malt barley.  The ideal pH for Beta Amylase is 4.0 to 5.0.  The pH of 5.2 is an arbitrary number that strikes a balance between the needs of alpha and beta amylase and seems to create the most efficient wort... bet you didn't know that... Remember beta amylase can not break up the longer chains of starch.  Only alpha amylase can do this.   


Alpha Amylase
Alpha amylase breaks down long-chain starches and carbohydrates.  Alpha amylase is active from about 150 F (65 C) to about 163F (72.7 C).  The optimum temperature is around 156 F (68.8 C).  A rest at alpha amylase will slightly improve the mouth feel of a beer.  It creates Maltose and maltoriose.  An interesting fact about Alpha amylase is that it is completely unable to function in the absence of calcium.  It works by attaching to random locations along a starch chain.  Because it can act anywhere on a carbohydrate molecule alpha amylase tends to be faster acting than beta amylase.   Alpha amylase ideal pH is 6.7–7.0, 


An enzyme after mash out.
The MASH OUT rest: Temperature range 168 F +, Active Enzymes - none.  
The point of the mash out is to turn off the enzymes.  The brewing enzymes are, in fact, proteins.  Like all proteins they are trying to bind to something; trying to work on something; trying to interact.  By raising the temperature above 168 F, you are damaging the working parts of the enzymes and basically turning them off.  This is called denaturing proteins.  They can no longer act on the starches and proteins.   By doing this you create a less viscous ( Less thick) wort and a wort that will flow more completely and with more of its desired sugars and flavors into your boil kettle.  Again this is a fact, there is no reason to argue it.  You can argue whether or not it is worth it, but you can't argue the science behind the reasoning. 

So I took this from the previous post.  Here are some time tested proven step mash programs.  I have used them all.  They all work.  And yes, they take longer.  If you have an automated system then these are a walk in the park for you.  If not, you'll have to do some math.  Fortunately Brewersfriend has a great infusion calculator for you to use.    If you are infusion step mashing you will need this calculator open on brew day. 

If you are not familiar with infusion step mashing, you should get your self familiar with it.  Basically you start with a thick mash, and add boiling water to the mash to raise the temperature.  It is actually faster than most recirculating mash systems. Boiling water additions are faster than a heating element.

A Step Mash for clarity and body.
100 F for 20 minutes
134 F for 20 minutes
145 F for 30 minutes
155 F for 20 minutes
168 F for 10 minutes

A Step Mash for maximum phenolic expression.
100 F for 20 minutes
113 F for 35 minutes
134 F for 10 minutes
150 F for 30 minutes
168 F for 10 minutes

A simple step mash for maximum extraction of sugar
100 F for 20 minutes
150 F for 45 minutes
168 F for 10 minutes

Step mash for dry beer - dry stout & dry lager like ales
145 F for 30 minutes
152 F for 50 minutes
158 F for 30 minutes
168 F for 10 minutes


Monday, August 8, 2016

Belgian Dark Strong Brewday - Step Infusion & Schluss Decoction

So Saturday the team was back together in John's Garage for a Belgian Dark Strong Brew Day.  And we were joined by Mark Anthony's college friend Brian (who I refer to as Steve).  This was Brian's first brewing experience and probably not the best first brew to learn the craft.  After all we were brewing a multi step Belgian Dark Strong Ale, loosely based on Dogfishhead's Raison d'etre.

To brew this beer and to really get the maximum expression of flavors, you have to step mash.   And since we do not have a big fancy electric system capable of step mashing 10 gallons of beer at a time at full  water volume... we have to do infusion step mashing.

For those of you who are not aware, infusion step mashing is the process of adding boiling water to your mash in order to raise the temperature.   By adding a certain amount of water you can raise the temperature to your next rest.  This was a really big beer, over 27 lbs of grain in the mash.  Plus two sugar additions, Dark Candi syrup, and 2 lbs of brown sugar With a really big beer you tend to run out of water before you reach mash out temperatures.  .   But, have no fear, when this happens you can just pull a Schluss Mash Decoction and add it back in to get to mash out.   And that is what we did.  We rested at 103 F,  Then at 113 F,  134 F, 146 F, 156 F, and then we were out of water.  Now by this point we are literally 2 hours into the mash.  (Yes, two hours... and don't judge till you try it.   Nothing compares to the flavors created by a small batch step mash.)  So to get to mash out, we pulled 2.25 Gallons of wort and brought it to a boil, and then added it back into the mash.   Easy, but time consuming.  The volume was right on the money.  The gravity was a tiny bit low.   We were shooting for 1.081 we got 1.074.  Not too worried about it.  Should still be a great beer.   Don't sweat minor misses like this.   They have no impact on your beer.

Now, I am the first to admit that infusion step mash brew days are complicated.  I spend most of one of these brew days on the computer, calculating and recalculating our water additions.    I will be the first to admit that it is not always necessary.   If you are brewing anything other than a big Belgian ale, or a German lager you do not really need to step mash.  But if you want to make a world class BDSA,  you have to step mash.   And believe me,  I have had all of the worlds great BDSA/Quad/Monastery beers. Ours is as good or better.  So, is a 7 hour brew day worth it... yes for us it is.   The satisfaction that comes from having other brewers taste your beer and say, "Oh my God, how did you do this?" is all the justification you will ever need for that kind of brew day.

So my advice, learn about step mashing.  Learn the sciency stuff.   If you want to make world class Belgian beers this is the key.

UPDATE:   The BDSA is as we expected it to be.   It is delicious.  But we are getting adventurous and with 5 gallons, we are adding bourbon soaked oak chips, and bourbon soaked cherries.   That should be pretty fantastic.   We will keep you posted.

Tuesday, June 7, 2016

Local Home brew store Brewday: Desir Tripel and Flower Child Saison

Brew Lab in Overland Park, Ks. 
So Saturday the gang was all back together.  But there was a twist.  We were all together, but we were brewing at our Local Home Brew store.  I have been to many home brew stores across this great land. And I have to say, for brewing beer, BrewLab in Overland Park, Kansas is one of the very best.   BrewLab has anything you could need to brew anything you want to brew.   If you live anywhere near Kansas City, or if you are just passing through and want to try a beer, stop by the Brew Lab.

BrewLab Selection of Grains!  There are more under the
counter in 5 g Rubbermaid containers. 
Their selection of grains is with out match in this area, and they sell them down to the 1/10th of a lbs.   The hops are available prepackaged, or in bulk.  And again you can buy down to 1/10th of an ounce.   Pretty Dang Cool. But the coolest thing about BrewLab is that they have 2 fantastic electric HERMs 3 vessel systems.   Andrew, invited us to come brew with him.   So, we did. But we are Counterbrew and we wanted to stick with what we have said in previous posts. So, rather than using his fancy systems, we used our 100 quart mash tun for mashing, and used his stuff for heating water, and boiling.

27.7 lbs of grain.
fills a 5g bucket
Our goal today was to re brew our belgian tripel inspired Desir et la Nuit.   We all love this beer.   It is a Belgian Tripel made with orange peel, and honey.  The resulting beer is fantastic the strong malt profile of a tripel, with a remembrance of honey and orange.  Strong but graceful.   The manager of BrewLab Andrew had the water de-chlorinated, heating and ready when we got there.  But there was one challenge, the water in old Overland Park is very high pH.   The pH meter read 9.2... Holy Hard water Batman! So we had to use some acid, some gypsum, and some Epsom to get it where we wanted.  Our grain bill has 12 ounces of acidulated malt, so once we got to 6.2 pH, we trusted the grain bill to take it the rest of the way.   Our grain bill was 27.7 lbs of grain and 4 lbs of organic local honey.  That is a lot of grain.  And our predicted OG was 1.082. So we decided to partigyle the grains and make a Saison  with the second running.  The Saison was inspired by Boulevard's Spring Belle Saison.   (More on that later... floral hops, floral additions... should be amazing).

Jake and Ben, hanging out and talking during the mash.
The 100 qt cooler has a door on top for stirring and additions.
Once the water was adjusted, we set up to dough in.  Doughing in this much grain is a 2 person job. But once doughed in we hit our target rest temperature of 115 F.   This is a step mash.  We began with a beta glucan rest. The wort turned milky over the next 15 minutes.  Our next rest was achieved by adding boiling water to take the mash to 132 F.   Where we again rested for 20 minutes while our next infusion heated to a boil.   So far so good, everything was going smoothly...

One of 2 eHERMs systems at BrewLab KC
And here is where we goofed up.  We were impatient on the next addition.  It was probably only at about 200 F when we added it.  The laws of thermo dynamics are not something to be trifled with.  So rather than rising to 146 F as we had hoped, we rose to 139 to 142 F.  Well Damn! Still firmly in Beta Amylase Saccharification range, but seriously?  There is really no curing this screw up.  We could have pulled a decoction and brought it to temperature, but this was supposed to be a tripel, we didn't really want that color to change. So we just went forward.   Our next addition (final addition) brought the mash to 148 F.  Where we rested for 30 minutes.   To get closer to mash out, and to get the deep golden color we wanted, we pulled a 4 gallon thin mash (no grain) decoction, boiled it and brought the temperature back up to 158 F.

the tripel boiling in
a 20 gallon kettle
We collected 13 gallons of wort (mout) as we had predicted.  The boil on their system is fast and awesome.    We knew that after kettle loss and boil off we would package around 11 gallons of wort.  We did meet one challenge in the boil,  our preferred hop for this brew is Styrian Golding.  Unfortunately, Styrian Golding is 1.4% Alpha Acid this year.  To get our bittering IBUs we would have had to add 7.8 ounces of hops for 60 minutes, and 4 ounces for flavor.   And that would have made a grassy, grassy beer.  So we switched the bittering hops to Willamette.  At 10 minutes we added 4lbs of local organic honey.  We pitched T58 and BE265 (abbaye) into well aerated wort.    This should be amazing beer, if it is anywhere close to our last batch of this, well be in for a treat.


The Saison boiling in a 20 gallon
kettle.  Looks so small.
Here's a quandry,  what do you do with 27.7 lbs of grain on a infusion mash/ no sparge brew day?   I mean, they are just sitting there.  They still have loads of sugar in them.   Here's an idea,  Partigyle.   If you are unfamiliar with partigyling a batch of beer, it just means this.   After you have collected your wort,  you add more water to the mash tun and collect a second batch of wort.   We knew that in a beer that was generating 1.062 wort for our first batch, if we just added 7 gallons of 168 F water to the mash tun, we would collect a 1.031 wort 15 minutes later.   You see there is till a lot of sugar in the grains.  And as long as your pH is in line and your temperatures are not too high, you can still collect this wort and make a beer out of it.   It was a common practice among English brewers of old.  We'll be exploring this more in a future post.   But on this day, we used the second runnings to make a Flower Child Saison. A saison hopped with Noble Hops, and flavored with Heather, Chamomile, Corriander, and Black Pepper.   I'm almost as excited about that batch as I am for the tripel.   If you're in Kansas City in about a month stop by the BrewLab and give it a try.  BrewLab can not sell you a beer, but they can let you try a sample.  They usually have some pretty cool stuff on tap.  Ever tried a Cascadian IPA and a  Pliny the Younger Clone, on the same day?

Overall it was a fun brew day.  But our next batch is going to be a simple straight forward single infusion mash.   No complications, no decoctions, no step mash, just simple straight forward beer.  I think we all need a break from complication for a while.   I think were leaning toward an americanized ESB  that John Designed, or maybe a Centennial Blonde.   But for you brew geeks, don't worry, Mark and I will be doing another crazy small batch soon, and probably some wine.

Friday, June 3, 2016

Belgian Tripel - Total Brewing Geekery - No Sparge, Water Adjustments, Step Mash, Decoction, Partigyle

So this coming weekend, we will all be brewing together again for the first time in a long while.  I for one am looking forward to it.  We will be brewing our Belgian Tripel.  A truly amazing beer.  And we will be beer geeking out about as much as home brewers can geek out; No Sparge / Infusion step mash / Decotion / Partigyle/ with full water adjustments.  Without crazy expenses and fancy brewing systems this is about as brew geeky as you can get.

The infusion mash has been covered in previous posts.  I hope you all will read them.  I am a big believer in step mashing.  If you are hoping to make a Belgian style beer you should step mash every single time (whether or not you are using well modified grains).   A Belgian mout (wort) is a complete wort.  It is developed in every way, the protein, the mouth feel, the ferment ability.   You can not do that with a single infusion.  You can get close, but it will never be the same.  This beer is a great example.   This beer features 8.5% ABV, but the alcohol is balanced by the right amount of sweetness, and a luxurious mouth feel, tastes of honey, orange and spices. Amazing.


A Beer Geek Guide to step mashing part 1 understanding the science
A Beer Geek Guide to step mashing part 2 planning the recipe

Desir et la Nuit - Belgian Sytle Tripel
11 Gallon
1.083 OG
1.019 FG
25 IBUs
6  SRM
8.5% ABV
19.5 lbs of Pilsner Malt -  Europils by Cargill
 5.5 lbs of Wheat Malt
 4.0 lbs of Honey
 1.0 lbs of Biscuit Malt
 1.0 lbs of Aromatic Malt
 .75 lbs of Acidulated Malt
2.6 oz of Styrian Golding at 60 minutes
2.0 oz of Styrian Golding at 25 minutes
1 package of Fermentis Safale BE256 (abbaye) - Fermentis
2 packages of Fermentis Safale T58 -
2 tsp of yeast nutrient at 10 minuts
2 ounces of orange peel at 10 minutes
1 tsp of Corriander at 10 minutes
2 tsp of Irish Moss at 5 minutes

The mash schedule is so well detailed in a previous post.  To understand the mash schedule you really need to read that post.   But to be brief,  We'll do a beta glucan rest, then a protein rest, then a sac rest, then a second sac rest.  All of these will be made by infusion mashing.  Finally, we will be pulling a thin mash decoction and using it to do our mash out.    It is a wonderful, and complicated mash.   It will be a lot of fun, and should create a world class mout...or wort...or gyle... or what ever you want to call it.

We're actualy brewing this one at our local home brew store.  So that should be a blast.   That is all for now sports fans.

Prost.


Tuesday, May 24, 2016

A beer geek guide to step mashing: Planning the recipe... Belgian Tripel

Once again we are humbled by your response to the "Beer Geek guide to Step Mashing".  We are all truly touched by those of you who went right out and tried step mashing for the first time this weekend.  Thank you for your comments and photos on Google+ and Facebook. John is going to get us more active on Twitter and several other social media sites.   And for those of you who did not rush right out and step mash.  There are two more posts, this one, and an actual brew day.  In about a month we will be doing the ultimate beer geekery Bohemian lager Brew day where we combine both infusion mashing and decoction.

Ok, so you want to try a step mash.  You want to experience all of the benefits of this traditional mashing process.  You want to have more connection to your mash.  You want to have more involvement in your brewing.   You read the previous post, and you know that resting a mash at certain temperatures can have a significant impact on your final product.    So how do you plan the recipe?   If you haven't read the previous post, now is the time to go back and read it.

Well, sports fans, John is our resident recipe planning guru, but I will share my process for planning a step mash with you in hopes that you will follow a similar train of thought when you design your recipe.  I will be sharing a recipe for our Belgian Tripel (Desir et la Nuit)  And I will be sharing the process I followed to create the recipe.  The first thing you should know is that this recipe began life as a La Fin du Monde Clone.   It was the step mashing that took this recipe to the next level.  It was good as an LFDM clone.  But after we added the step mashing, the recipe went to another level.  This is without question the best beer we have ever brewed, and that is saying a lot.   This is among the very best beers that I have ever tasted.  I am obviously proud of it, and I dearly hope you will try it.  I am confident that it will become part of your standard lineup.


So,  we begin with a desire to take our LFDM clone and make it somehow even better.   We loved the malt profile.  We loved the slight expression of honey.  We were not trying to correct problems as much as we were seeing if the recipe could become even better.   And boy oh boy did we succeed.

What we wanted
  • Malty, grainy, bread-like, and sweet, without being cloying.
  • Reasonable clarity - we didn't want it to be perfectly clear, but not chunky either.
  • Full attenuation - a very digest-able wort
  • High alcohol that is completely hidden by the flavor of the beer
  • Rich mouth feel
  • Luxurious
Jerry Vietz,  Unibroue
Master Brewer.
Now this is a big list.  And we were trying to actually improve on a beer that is world class.  A beer that is revered and adored by all but the skinniest jean wearing hipster beer nerds.   A beer made by artisanal brewers in Chambly, Quebec, Canada.  A beer made by a brewery that uses French words, and classic Belgian techniques.  A seemingly insurmountable task.

But we had an advantage or two, or three.  We are home brewers.  We have access to the full range of techniques.  We are unbound from the limitations of a commercial brewing system.  Step  mashing is available to us.  We were able to taste our wort as we mashed.  We are only brewing 10 gallons,  Adjustments are easy.  So we knew what we wanted, how did we make it happen?  Let's break it down.

Acid Rest -  We wanted some clarity and we wanted a good mouth feel,  We also wanted a beer that would have have a great fermentation and attenuation.   Sounds like we need to rest for a while at a temperature that would promote Glucanase activity. Glucanase, as you may recall breaks down Beta Glucans. So 115 F for 15 to 20 minutes.    Remember at 115 F Some Peptidase is also active.  Which is fine, we'll accept whatever ferulic acid is produced by this rest, even though phenolic flavor is not our focus with this beer.


The mash will begin to thin out in
the protein rest.
Protein Rest -  We did not want extra Phenols or Esters in this beer.  We were happy to accept whatever the yeast produced with whatever ferulic acid that was created by the Acid rest.   It is our opinion that true Belgian Tripels are not particularly spicy or phenolic, maybe just a hint.  So we wanted a protein rest that would improve clarity without diminishing mouth fee.  We needed to have a rest that promoted Proteinase.  Proteinase breaks long chain amino acids into medium length amino acids. Sounds like we need to rest at  133 F to 135 F for about 15 to 20 minutes.

Saccharification rests will be at temperatures you are more
familiar with.  Make sure you taste your mash before you
 move on to the mash out. 
Saccharification rest -  When brewing a Belgian Syle beer, we adhere to the concept of digest-ablity.  It is more than just fermentability.  It is the Belgian concept of respecting the grain, producing the ultimate mout (wort) from the grain.  The ultimate, color, mouthfeel, and ferment-ability.  We need this beer to finish completely without losing mouth feel.  Now remember we are going to get some great mouth feel from our protein rest.  So we can afford to have a saccharification rest that would promote maximum extract and create a wort that is highly digest-able.  Our strategy would be to rest at 146 F for 30 minutes, and then rest at 156 F for 20 minutes.  We have found that this strategy creates a wort that will provide fully convertible sugars for the yeast.

A thin mash decoction is just wort that you pull, and bring
to a boil in order to raise your mash to mash out temps.
Mash out-  We believe in mash out, if you don't that is cool.  I'm not your brew mom.  You can skip this if you want.  But for us, this is another chance to further break down the long chain proteins that can impact your beer negatively. We mash out with a thin mash decoction wort.  So we would be doing a thin mash decoction and mashing out.

If you have a recirculating infusion mash system, then just follow the temperature schedule.  That is one of the few justifications for the expense of these systems.  They make step mashing a breeze. Fill with water, set your temps, go through your steps... done!  I still am attracted to the recirculating BIAB systems, like Brausupply, Colorado Brewing Systems, High gravity, and Grainfather.

We do not have a recirculating mash system, yet.  Although we are working on converting the keggle to a gas powered recirculating system.   When we brew 5 gallons we can heat our mash.  We have an electric turkey fryer that can pull double duty as a mash tun.  But when we brew 10-gallon batches, we tend to use a 100-quart rectangular cooler.

So, how would we be able to do a step mash for a 10-gallon batch, in a cooler that has no heating element?   The answer is an old technique that you may or may not be familiar with.  We would be doing an infusion step mash with boiling water.

Infusion mashing is adding boiling water to your mash to increase the temperature of the mash.   It is how we did step mashing in the dark ages.   The concept is simple.  When you add boiling water to the mash, the temperature increases.   So, in theory, you can add enough boiling water to raise the temperature of your mash from step to step.

Wait, won't that kill the enzymes?  Well, yes, a few.  a few of the enzymes will be denatured.  But the overwhelming majority will survive.  The enzymes will not be affected enough by the boiling water to impact the mash or the mash efficiency at all.  It may seem counter intuitive but it works.

But how do you know how much water to add?  For that, we turn to our trusty old friend... the interwebs.  There are so many great brewing calculators out there.  Some of them will even calculate the amount of boiling water you need to add to change the mash from one temperature to the next rest temperature.  I generally use Beersmith or Brewtoad.   But for mash water calculation I turn to "brewers friend"  Mash Infusion and Rest Schedule.   I am a fan of brewersfriend.com.  When they make recipe input easier, I will probably switch over to it.  It is rich with features, and even includes basic water chemistry.

OK, so to calculate the infusions, you have to start with some basic information.  You have to know your batch size, your total lbs. of grain, your water to grain ratio and your boil off rate.   Your boil off rate?  Yes, how else will you know your water to grain ratio?

The acid/beta glucan
 Rest will be very thick.
Relax, you're adding more water.
So our recipe has the following characteristics.
  • 27 lbs. of grain
  • Grain absorption rate .1 gallon per pound of grain.
  • Boil off rate is 2 gallons per hour
  • So we start with  15.7 gallons of water.
    • The math
      • 27 lbs. of grain will absorb 2.7 gallons of water
      • Pre-boil volume is 13 gallons
      • Post boil volume is 11 gallons
You have to know this so you know how many gallons you can not exceed.   When you are infusion mashing you may end up doing no sparge, or very little sparge.  RDWHAHB, it works.    This is true because when you are infusion step mashing you will be adding water throughout the mash to raise temperatures.   Every recipe is different, every mash schedule is different, it will make more sense as you do it more often.   Sometimes it will come out just fine and you'll have extra wather for sparge, sometimes there won't be much left.   Just don't exceed your total water needed.  As you plan your recipe you will know if you have extra for sparge.  Remember you could use your wort for sparge.  You could just vourlauff a lot, or recirculate a lot,  That will have a similar effect.  But it is easier to just plan on a slightly lower efficiency.  We plan on 75% with this method. You do gain back some efficiency from the step mash.

So here is what brewersfriend.com mash infusion and rest calculator comes up with
  • Strike with 8.37 Gallons of water at 123.1 F - Rest at 115 F for 15 to 20 minutes.
    • Wait, wait, wait.  15 to 20 minutes?  why not a specific time? 
      • OK here's why.  Your next addition may or may not be boiling yet.  Relax, times are not as big of a deal as you have been taught.
  • Add 2.5 Gallons of boiling water, stir while you are adding - Rest at 135 F for 15 to 20 minutes.
  • Add 1.8 Gallons of boiling water, stir while you are adding - Rest at 145 F for 30 minutes.
  • Add 2.8 Gallons of boiling water, stir while you are adding - Rest at 156 F for 30 minutes.
    • At this point you have used 15.47 gallons of your alloted 15.7 gallons.
    • So just add the other .23 gallons of water to the mash out at 168 F. 
  • Pull a thin mash decoction large enough to bring the mash to 168 F. About 4.75 Gallons.
Whew!  That is a complicated mash schedule.  And Long, Probably almost 2 hours.  Yes, 2 hours.  But it is so worth it.  First of all, it is fun and active.  You will be far more in touch with your brewing.  Second, the flavors and mouth feel can not be recreated any other way.

You may have also noticed that we are using 27 lbs. of grain and 15.7 gallons of water,  You can not pull this off in a 10 gallon round cooler. So if that is your mash tun, be prepared to do a 5-gallon batch instead of a 10 gallon.   The mash at it's largest will be 17.82 gallons.   Our desire to do no sparge, and to do infusion step mashing is part of why we have a 20-gallon rectangular cooler with a door on top.

Next, this coming weekend we will be brewing this recipe with an illustrated guide to step mashing with infusion step mashing.   We will also partigyle the grains.  A 1.074 beer will produce a 2nd runnings wort of about 1.037.  A quick sugar addition will turn that 2nd runnings batch into a 1.050 session saison.   So, talk about efficiency?  We're getting 15 gallons of beer from this one batch of grains, and we could get 20 if we wanted 20.    The saison we will have some fun with.  Think Jake has some ideas for hops and dry hopping.  Should be fun.

Additional content;  While researching this recipe I discovered tastybrew.com mash infusion calculator.  I'm impressed.  We probably won't try it with this recipe, because we know brewersfriend.com works so well.  But I will definitely be giving it a go on my own.  Here is what it came up with for our infusion rest schedule.


Friday, May 20, 2016

A Beer Geek guide to Step mashing... Understanding the Science Behind the process

Adding boiling water to raise temperatues.
Infusion step mashing.
So coming up we will be doing an infusion mash on our "Desir et la Nuit" (Belgian tripel with honey). What is an infusion mash?   Well, an infusion mash is a technique for raising temperatures in the mash with boiling water.  It is a step mash.  A step mash is a mashing technique where your mash rests at progressively higher temperatures during the mash.  You don't need a pump, you don't need a direct heat source for your mash tun.  All you really need is your mash tun and a way to boil water.  For those of you who have only brewed single infusion style.  This technique can open your brewing up to all kinds of new possibilities.  And, if you want to make truly world class Belgian style beers,  you will have to step mash.   There are mash elements that can not be created effectively with out step mashing.

Now, it is time to handle the argument against step mashing.  Many of you will say there is just no reason to step mash.  You will claim that modern malted grains are highly modified already and that they do not need to undergo the transformations that occur in a step mash.   To you I say... yeah, you're mostly correct.  Mostly, but not entirely correct.  What?  What the heck...just tell us what you mean.   Relax round eye, I will.   But first you have to take a moment and understand why step mashing is viable and important.

There are more enzymes at work in your mash than beta and alpha amylase.  There is more going on in your mash than the simple conversion of starch into sugar by these enzymes.  Want to make super clear beer?  Even more difficult want to make super clear beer with wheat or rye?  Learn to step mash.  Want to make an authentic Belgian style beer with lots of phenolic punch?   Learn to step mash.   Want to have more fun brewing, and be more active during the mashing process?  Learn to step mash. Want to control your water pH with minimal acid additions?  Learn to step mash (although acid rest for pH adjustment is tough to justify even for me)  Want to reduce chill haze in your beer?  Learn to step mash... I can keep going but I think the point is established.  LEARN TO STEP MASH.

great local home brew store in KC.
Recently I attended a meet and greet at a local home brew shop.   Some very competitive and experienced home brewers were present.   We each brought several bombers to share and try.   When we got to my Belgians, specifically The BSDA, the Tripel, and Alegement (raspberry blonde) the tone of our conversation changed.  They were clearly impressed by what we had made.  Comments abounded about the quality, aroma, and the taste.  One brewer said, and I quote "I'm so f*&kin glad you aren't competing right now".  While that was certainly an ego boost, what was more shocking was their reaction to my process.  Questions broke out about how we did it.  When I answered that each of these beers underwent a step mashing process the responses were all over the board.

There's just no reason to step mash, you're wasting time.  Give me the recipe and I'll prove it to you, a few additional grains can produce the same thing. 
Please be more specific on your process, exact temperatures of rests please...where was your pH, what were your water additions.. what phase was the moon in?
Wait, wait, wait... you actually did a betaglucan rest?


click on this and save it.  trust me you need it.
I know our beer was enjoyed that day.  I know our beer left a big impression.  I know, they know, that we are coming for their medals next year.   And I know I changed at least one of their minds on step mashing.   And 3 of the 4 have qualified for the NHC final rounds at some point in their brewing career/hobby. These are serious brewers.  They had great advice to share with me as well, on reducing oxygen exposure, and maximizing IPA flavors.  It was a great exchange of ideas.

So what are the steps of a step mash?  and more importantly what do they do?  And what are the enzymes you are dealing with at each step?

The ACID rest;  Temperature Range 95 F to 113 F,  Active Enzyme Phytase, Glucanase

Why perform an acid rest?  Well in truth, you don't really need to do an acid rest for the production of pH lowering acid,  unless you are using under modified grains, or unless you want to lower mash pH with minimal chemicals.   Phytase works actively on a molecule found in grains called phytin.  It creates phytic acid which can and will lower your mash pH.   But it takes along time (60 minutes) and really only does well in soft water.  If you ever want to do a true, rustic brew with minimal additions, this is the way to lower pH without chemicals.  It is also a pain in the ass and takes forever.  It is much easier to add some Acidulated Malt to the grist.

Step mashing improves clarity!
The real reason to do a rest at this temperature is to break down beta glucans (gum). Beta Glucan is a gumy carbohydrate that surrounds the starch molecule of a grain.   They get in the way of the amylase and glucans are the chief contributor to chill haze in your beer.   A brief rest at these temperature ranges will allow
glucanase to break down the Beta Glucans.  End result, clearer beer, and slightly better conversion.  Especially important for wheat, and rye.   Ever wonder why Berliner weiss is clear, and American Wheat beer is cloudy?  Glucanase is why.

The PROTEIN rest;  Temperature Range 113 -138 F,  Active Enzymes Proteinase, Peptidase

Why perform an protein rest?  Well actually you should view the two protein related enzymes differently.  They work at different temperatures.

Proteinase works at 131 F to 138 F and is thought to reduce haze with out reducing body.  It breaks long chain amino acids into medium chain amino acids.  You want medium chain amino acids in your beer.

Peptidase works at 113 F to 128 F.  Peptidase breaks medium chains into their components.   So if you want to express maximum esters or phenols in a Heffeweis or in a BSDA, you really should consider a protein rest around 115 F.  The key acid you are trying to maximize is called Ferulic acid.  A Peptidase rest will help you maximize it's availability.  Then all you have to do is use a yeast that is POF+, or phenolic off flavor positive.   If on the other hand you are looking for clarity, without a loss in mouth feel,  you should consider a mash rest that maximizes Proteinase action (136 F).

The SACHARIFICATION rest;   Temperature range 140 F to 162 F, Active Enzymes Alpha and Beta Amylase.

If you are reading this blog,  you probably already know a bit about beta and alpha amylase enzymes.  You have been told that alpha works at higher temperatures and breaks long chain starches into medium chain starches.  You have been told that beta amylase breaks off the branches of longer chain starches into highly fermentable sugars.   Everything you have been told is true.   But let's get more specific.   Beta amylase is active from about 132 F to about 151 F.   A long rest at optimum beta amylase temperatures can produce a highly fermentable wort that will finish dry.   Alpha amylase is active from about 150 F to about 163F.   The optimum temperature is around 156 F.  A rest at alpha amylase will improve the mouth feel of a beer.   Remember beta amylase can not break up the longer chains of starch.   Only alpha amylase can do this.  

A step mash allow you to produce a highly ferment able (Belgian concept of digest able) wort that still has mouth feel.  Our tripel is almost 9% alcohol.   We got over 80 % efficiency and 81% attenuation of the wort.   But the mouth feel is luxurious and rich.   The beer is clear, the color is burnished gold.  You can not do that with out a step mash.  Don't argue this point it is a simple fact of biological chemistry.   You can come close with grain additions, and fining.   But you can not get it exact.

An optimum temperature for an easy mash is 150 F to 152 F.  You kinda get the best of both worlds at that temperature.  Kinda, but not really.   We see high efficiency from step mashing, always in the high 70 s.  And remember we are generally no sparge / partigyle brewers.  So efficiencies approaching 80% from a no sparge are pretty fantastic.

The MASH OUT rest;   Temperature range 168 F +, Active Enzymes - none.  

The point of the mash out is to turn off the enzymes.  The brewing enzymes are, in fact, proteins. Like all proteins they are trying to bind to something.  Trying to work on something, trying to interact.   By raising the temperature above 168 F, you are damaging the working parts of the enzymes and basically turing them off.  They can no longer act on the starches and proteins.   By doing this you create a less viscous wort and a wort that will flow more completely and with more of its desired sugars and flavors into your boil kettle.   Again this is a fact, there is no reason to argue it.  You can argue whether or not it is worth it, but you can't argue the science behind the reasoning.

Conclusion and call to Arms;

Listen, brew how you want.  Brew in the way that is the most fun for you.  But please, don't refuse to understand a technique that can improve your beer just for the sake of narcissism.  Don't stick to one style of brewing because you once shot your mouth off on a brewing forum about it's benefits or lack there of.   Remember, I was once the anti BIAB, anti no sparge, traditional brewing Nazi.  I was the jerk saying they just didn't work.  I was the idiot arguing on forums about the absolute necessity of fly sparging.  I changed by trying new and different approaches.  Not only did it improve my beer, it made brewing loads more fun.   So give this technique a try.  It works.  It will open up subtle flavors to your brewing that you can not develop with out it.  The best brewers in the world use step mashes. It will improve your beer.  And more importantly it is so much fun.

Here are some time tested proven step mash programs.   I have used them all.   They all work.  And yes they take longer.  If you have an automated system, then these are a walk in the park for you.  If not, you'll have to do some math.  We'll cover that math in our next installment.  Planning your Step Mash.

A Step Mash for clarity and body.
100 F for 20 minutes
134 F for 20 minutes
145 F for 30 minutes
155 F for 20 minutes
168 F for 10 minutes

A Step Mash for maximum phenolic expression.
100 F for 20 minutes
113 F for 35 minutes
134 F for 10 minutes
150 F for 30 minutes
168 F for 10 minutes

A simple step mash for maximum extraction of sugar
100 F for 20 minutes
150 F for 45 minutes
168 F for 10 minutes

Step mash for dry beer - dry stout & dry lager like ales
145 F for 30 minutes
152 F for 50 minutes
158 F for 30 minutes
168 F for 10 minutes